Step-by-Step Guide to Wireless Bike Computer Installation: Featuring INBIKE
Got a new wireless bike computer? Fantastic! Let’s get it set up with this wireless bike computer installation guide so you can start tracking your rides better. Here’s how to do it without any fuss:
Step 1: Check Your Kit
Open your wireless bike computer kit and lay out all the parts for the wireless bike computer installation.
You should see the main unit (the computer itself), a sensor, some mounting brackets, and tie wraps. Missing anything? You might need to contact the seller before you proceed with the wireless bike computer installation.
Step 2: Mount the Computer
Find a good spot on your handlebar where you can easily see the computer screen while biking.
Fix the mount securely in place for the wireless bike computer installation. It should be tight enough so it doesn’t move around as you ride.
Step 3: Attach the Sensor
The sensor usually goes on your front fork for the wireless bike computer installation.
Use the tie wraps to fix it in place, making sure it’s facing the wheel. There should be a small gap—just a couple of millimeters—between the sensor and the magnet on the wheel spokes.
Step 4: Place the Magnet
Clip the magnet onto a spoke of the front wheel during the wireless bike computer installation.
It should line up nicely with the sensor each time the wheel turns. Getting this right is crucial for accurate data.
Step 5: Switch It On and Test
Now, turn on your wireless bike computer and follow the setup instructions to complete the wireless bike computer installation.
Give the front wheel a spin to see if the computer starts recording the movement. Not working? Check the alignment of the magnet and sensor.
Step 6: Customize Your Settings
Set up the wireless bike computer to suit your needs after the wireless bike computer installation. Input your wheel size, choose between kilometers or miles, and tweak any other settings like the alarm or backlight.
Step 7: Test Ride
Take your bike out for a quick spin to see how the computer performs after the wireless bike computer installation.
Keep an eye on the display to make sure it’s tracking your ride correctly. Adjust if necessary.
How To Install Your INBIKE Cyclocomputer?
Wireless launcher needs a 2032 button cell.Fix the magnet with screws.
Magnet can be aligned with the upper or lower of the launcher.Distance should be 3mm or so.

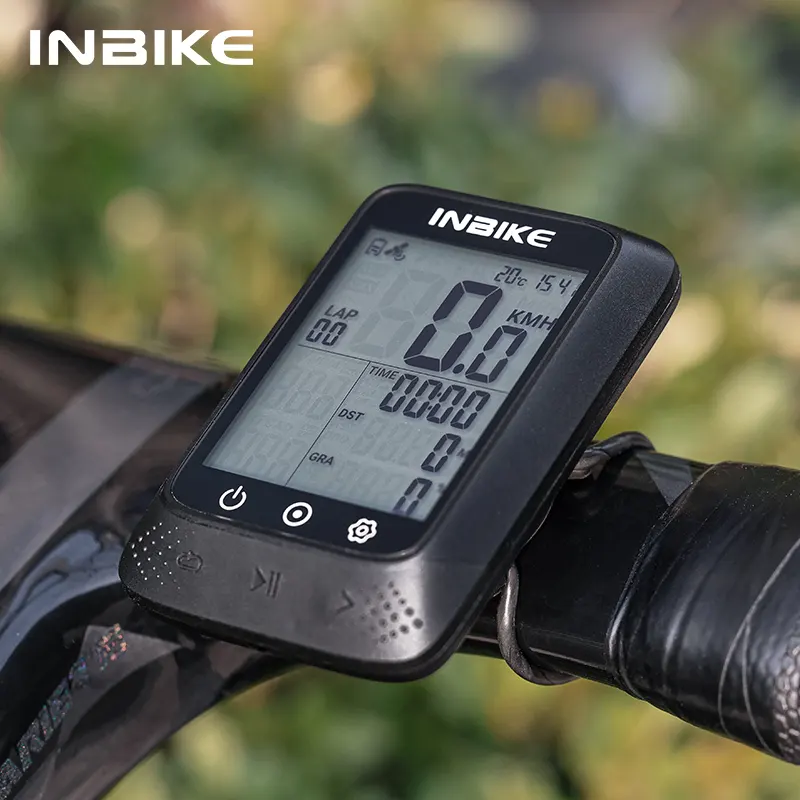
How about INBIKE Cycling Bike Computer ?
Now that you’re all set up, let me introduce you to the INBIKE Cycling Bike Computer. This device isn’t just any bike computer. It’s built to endure, with an IPX7 waterproof rating, so rain or shine, it keeps tracking. Thanks to its 27-hour battery life and fast Type-C charging, you’re always ready to go.
The INBIKE also boasts full lamination technology for a crystal-clear display under any lighting conditions.
With Five-Star Positioning and GPS, your rides are tracked with precision.
And, if you like to analyze your routes and share your progress, the INBIKE’s app makes data sharing a breeze.
Getting started with your new INBIKE is a piece of cake. First up, you’ll want to mount the computer unit onto your handlebar or stem using the provided mount. Most models give you a few options for positioning so you can get that display angled just right for an unobstructed view. Once secured, simply slide the computer into the mount until it clicks into place. Double check that it’s locked in tight according to the instructions.
Next, it’s time to sync up the wireless sensors. The INBIKE comes with easy-swap battery sensors for speed and cadence that attach to your wheel hub and rear derailleur. Higher-end models even have Bluetooth power meters and cadence sensors that’ll pair automatically, no fiddling required.
Last but not least, power that puppy on and follow the start-up prompts to input your personal stats like weight, fitness goals, and so on. With your details dialed in, your new INBIKE will crunch the numbers and metrics just for you, dishing out customized training insights all ride long.
With that waterproof casing, bright daylight-readable display, and advanced GPS mapping, your new computer will be your trusty companion through every commute and trail adventure. Whether pounding the pavement or shredding singletrack, it’ll faithfully record and analyze all the juicy data, helping you hone your skills and maximize the fun factor!
There you have it. You’re ready to ride with all the data you could need at your fingertips. Enjoy the journey and ride safe!